Install Nimbra Edge Connect on Linux #
Nimbra Edge Connect connects your local video sources and destinations to a Nimbra Edge installation. This guide is for administrators installing the software on their own Linux host. The CLI tool starts and configures its Docker containers for you.
Before you start #
You need:
- A Linux host that meets the video appliance requirements, with Docker Engine installed.
- Administrator access to the host (
sudo). - A Network Manager admin account in the intended group, or a superuser account.
- Docker Hub credentials supplied for your Nimbra Edge installation, if required to download its container images.
Use a dedicated host where possible. The CLI tool adjusts network buffers and CPU settings, and offers to configure Docker logging if it is not already configured. Applying the logging configuration can restart Docker and other containers on that host. Read the prompts before continuing.
1. Get the installation command #
If you want to install an Edge Connect for another group as a superuser, see Install an appliance in another group.
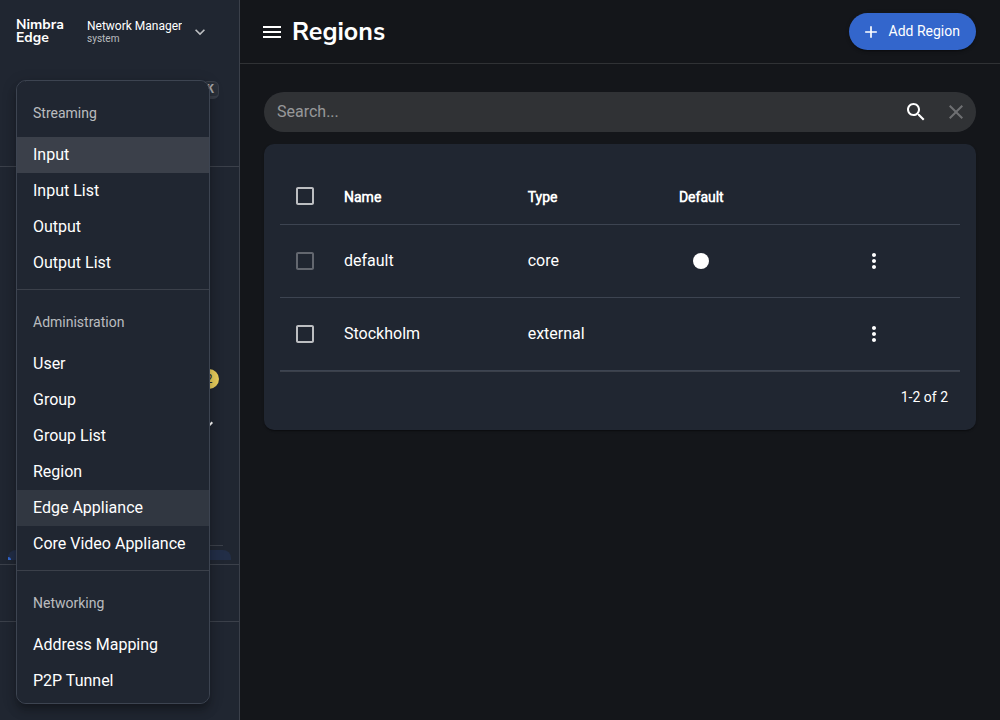
In Network Manager, open Create New… → Edge Appliance. The appliance will belong to your group.
Enter a name for your host, for example studio-1, and select the region it should connect to. If you use a Secondary Region, select that too.
A secondary region gives redundant streams a second path through another region. This helps protect against a region failure when stream redundancy is configured.
Click the copy icon beside the installation command.
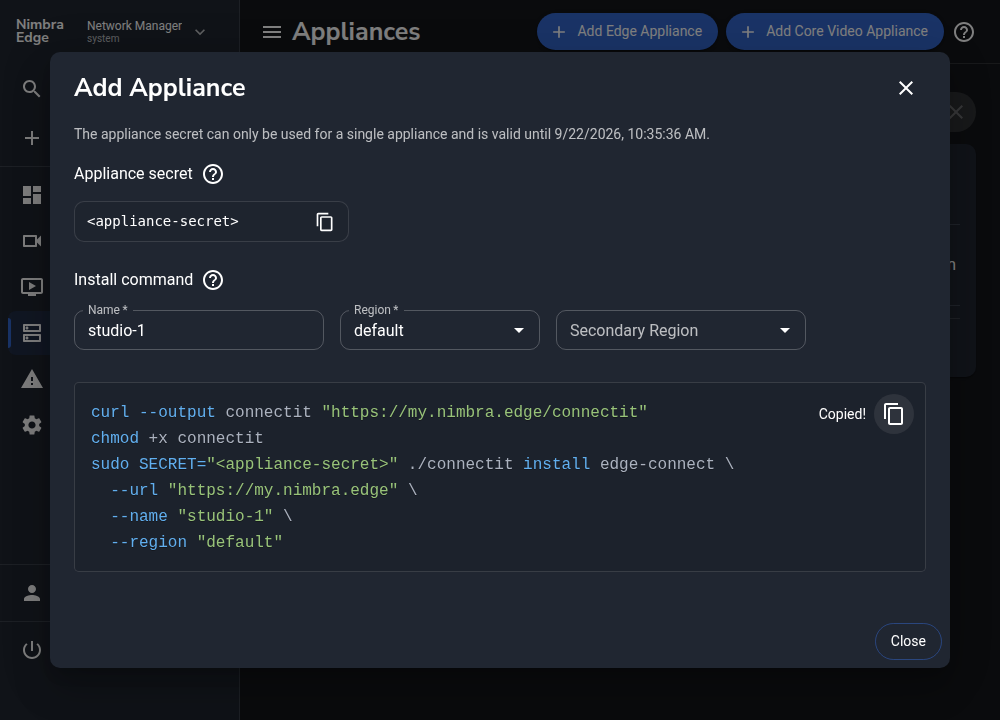
The command includes a temporary, single-use appliance secret. Keep it private. If it expires before you install the appliance, return to this dialog to get a new command.
2. Install on the Linux host #
Connect to the host, for example over SSH, and paste and run the copied command. It downloads the CLI tool from your Nimbra Edge installation and starts the appliance with the name and region you selected.
$ curl --output connectit "https://my.nimbra.edge/connectit"
$ chmod +x connectit
$ sudo SECRET="<appliance-secret>" ./connectit install edge-connect \
  --url "https://my.nimbra.edge" \
  --name "studio-1" \
  --region "default"
Using predefined group secret
Pulling Edge Control image (docker.io/netiedge/edge-control:R4.2.0)
Pulling Edge Data image (docker.io/netiedge/edge-data:R4.2.0)
Starting Edge Connect
Successfully started Edge Connect studio-1 connected to https://my.nimbra.edge!
Follow the prompts. If downloading the container images requires Docker Hub credentials, run sudo docker login with the credentials supplied for your installation and try again.
3. Check the connection #
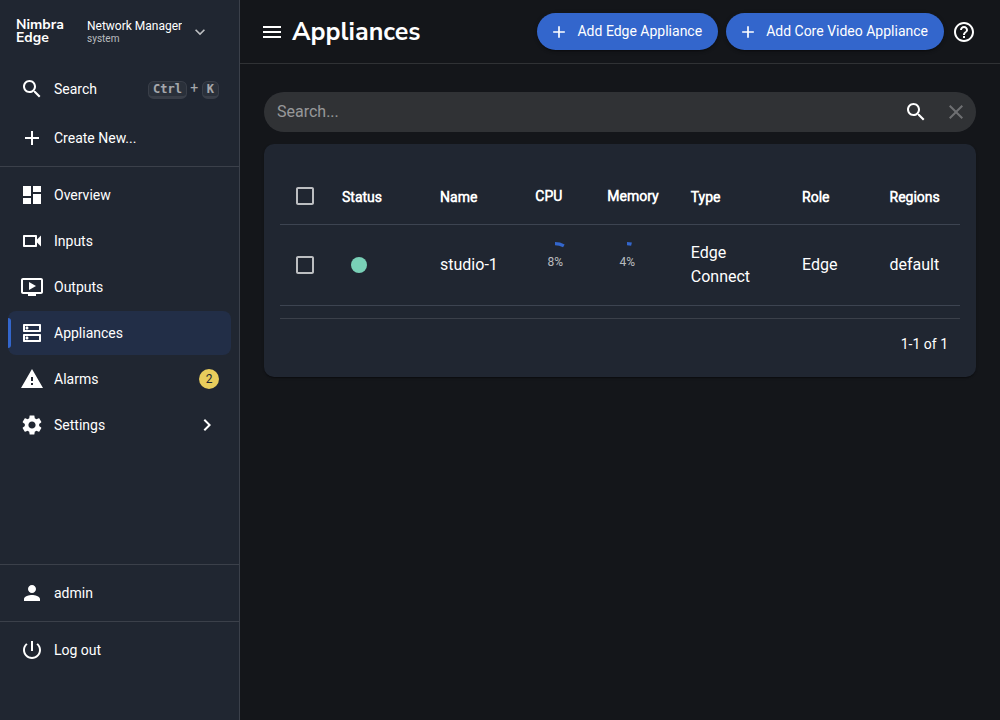
Open Appliances in Network Manager and find studio-1. Once it connects, its interfaces are available when you create inputs and outputs. If it remains offline, check the installation address, credentials, and firewall rules below.
Firewall considerations #
The following ports need to be opened for a Nimbra Edge Connect to successfully connect to the Nimbra Edge cluster for control and video traffic. Additionally, it also needs to be able to do DNS lookups (if the Nimbra Edge cluster URL is set as a hostname instead of an IP address directly) and do NTP synchronization.
| Ports | Protocol | Direction | Destination | Purpose |
|---|---|---|---|---|
| 443 | TCP | Out | Nimbra Edge API load balancer | Nimbra Edge Control Traffic (when using https) |
| 80 | TCP | Out | Nimbra Edge API load balancer | Nimbra Edge Control Traffic (when using http) |
| 20000-21000 | UDP | Out | Video appliances* | Nimbra Edge Video traffic (over RIST GRE tunnels) |
| 123** | UDP | Out | NTP server as configured | Time synchronization |
| 53*** | UDP or TCP | Out | DNS server as configured | Domain name lookups |
| Input ports | UDP or TCP | In | Local Edge Connect | Ports for listener mode Inputs |
| Input ports | UDP or TCP | Out | Remote source | Ports for caller mode Inputs |
| Output ports | UDP or TCP | In | Local Edge Connect | Ports for listener mode Outputs |
| Output ports | UDP or TCP | Out | Remote destination | Ports for caller mode Outputs |
* If a NAT mapping is used then the destination is the public IP addresses in the NAT mapping, otherwise they’re the IP addresses of the Core video nodes, or of the video appliances in an external region.
** 123 is the default port of NTP, but this can be configured. If using any other time synchronization protocol then the ports of that protocol need to be specified.
*** 53 is the default port of DNS, but if another port is configured on the machine, or another protocol such as DNS over TLS or DNS over HTTPS is used, then those corresponding ports need to be opened.
Input and Output source address whitelisting feature #
Edge Connect uses nft (nftables) in the edge-data container to whitelist traffic coming from specified source address ranges, if specified for the Input or Output in Nimbra Edge. Edge Connect uses a nft table called nimbra-edge to store the rules. To view the current rules run nft -a list table nimbra-edge inside the edge-data container. On shutdown Edge Connect will try to clear all rules, but if it fails the rules can be cleared using nft flush table nimbra-edge.
Since Edge Connect is using host networking (--net=host) the nft configuration is shared between the host and Edge Connect. The nft commands can therefore also be run on the host machine where Edge Connect is running. To install nft on Ubuntu run apt-get install nftables.
Note that the kernel also needs to support nftables, and the corresponding kernel modules need to be loaded. They are typically at least nf_tables and the required protocol modules.
Install an appliance in another group #
If you are a superuser installing an appliance for another group, omit SECRET="..." from the command and use --group to specify the group name, for example production:
$ curl --output connectit "https://my.nimbra.edge/connectit"
$ chmod +x connectit
$ sudo ./connectit install edge-connect \
  --url "https://my.nimbra.edge" \
  --name "studio-1" \
  --region "default" \
  --group "production"
Enter your Network Manager password when prompted. The default username is admin; add --user <username> if you use another account. The appliance is registered in the specified group.
Select the tunnel address #
Edge Connect automatically determines its tunnel address. On supported cloud hosts it first checks instance metadata; otherwise, it uses the local source address selected by the route to your Nimbra Edge installation.
On a host with several network interfaces, you can select a local tunnel address with the CLI tool’s --env option, which its help does not list:
$ sudo ./connectit install edge-connect \
  --url "https://my.nimbra.edge" \
  --name "studio-1" \
  --region "default" \
  --group "<group>" \
  --env EDGE_TUNNEL_IP=192.0.2.10
Replace 192.0.2.10 with an address assigned to the host’s video network interface. This selects the local tunnel address; it does not create a NAT or firewall rule. Use the appliance’s name, group, and region, and include --region-secondary if one is configured. Enter your Network Manager password when prompted. The default username is admin; add --user <username> if you use another account. The CLI tool asks before reinstalling the appliance, and streams using it are interrupted while its containers restart.